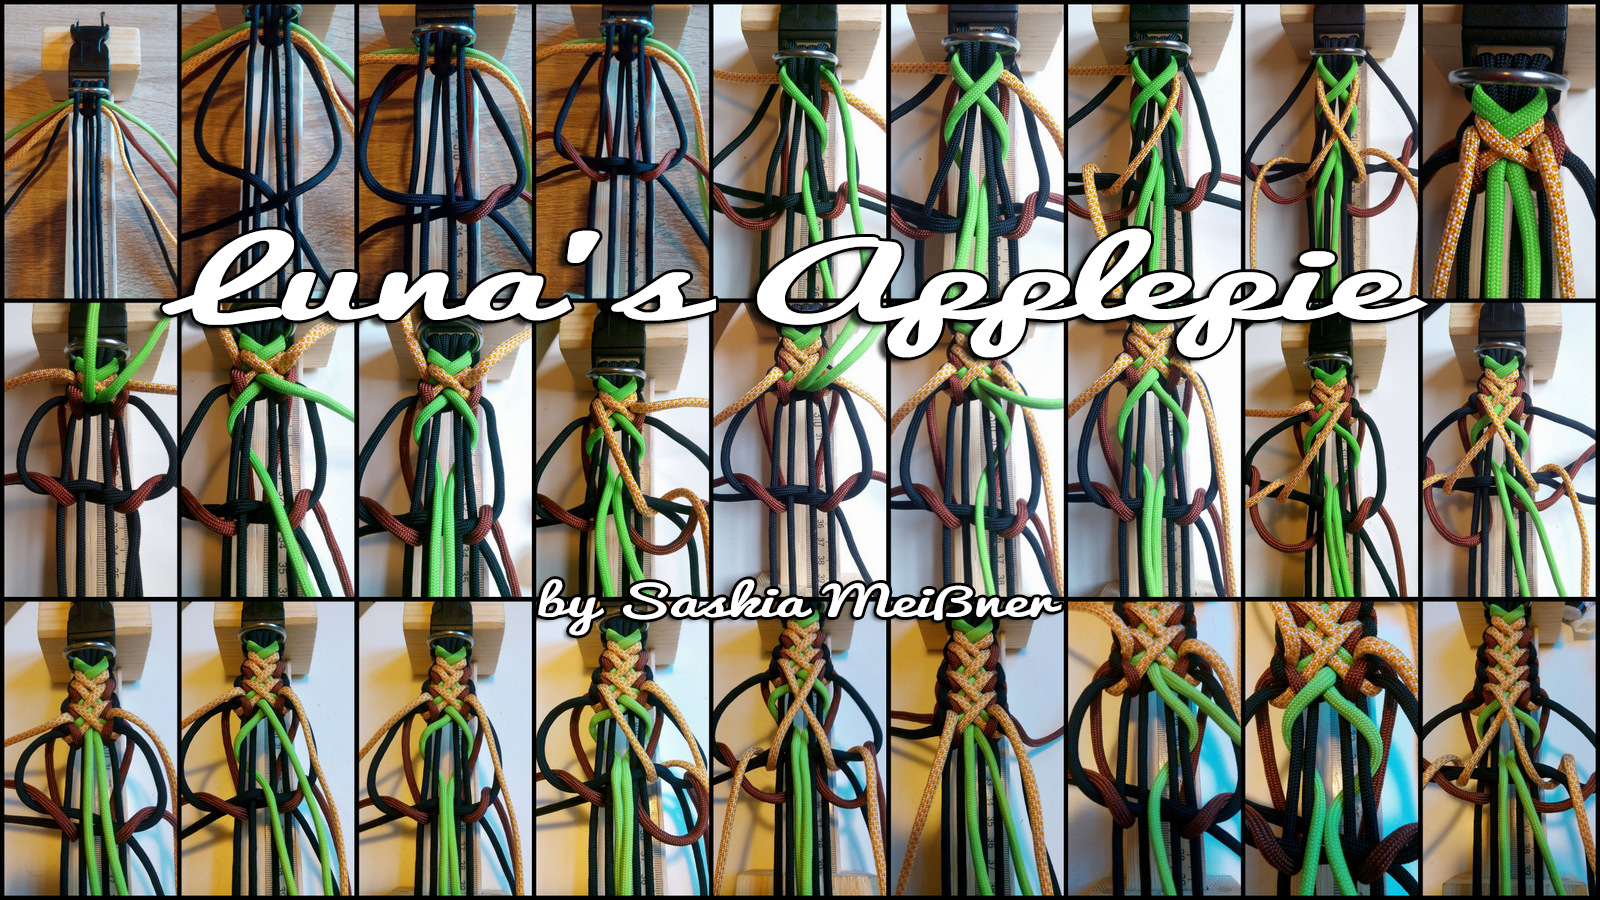
Ein grosses Problem bei vielen Paracordisten ist das genaue berechnen der flachen Länge eines Arm- oder Halsbandes. Auf der Seite „Tied In Knotz“ stand bis vor kurzer Zeit die wohl beste Erklärung dazu warum und wieso dieses Problem existiert und wie man vorgehen muss um jenes zu umgehen. Leider ist die Seite „Tied In Knotz“ seit einiger Zeit nicht mehr Online und ich habe hier einen Snapshop aus dem Webarchiv erstellt.

The Secret to Paracord Bracelet Sizing
Once you have an accurate Wrist Size Measurement, how do you calculate the correct Flat Layout Length? Remember, Wrist Size is really just the circumference around the wrist where the bracelet will be worn. Wrist Size IS NOT the same as Flat Layout Length.
Making bracelets for yourself, and sizing them correctly, can usually be done by the old „trial and error method„. That is if you create your bracelet and it turns out too tight (or too loose); you merely make another one and adjust the length accordingly.
But what about when you are making a bracelet for someone else and all you have is their Wrist Size Measurement? Then you can’t use the „trial and error“ method. Rather you need to have a reliable way to calculate how long you need to make the bracelet, so that when it is closed around the wrist of the one you are making it for; it will fit just right. Learning how to make the needed calculation is not that hard, but it does involve some basic equations and mathematical axioms having to do with circles, circumferences, diameters and the mathematical constant known as pi (3.14159). To the best of my knowledge, the following information does not exist anywhere else on the internet.
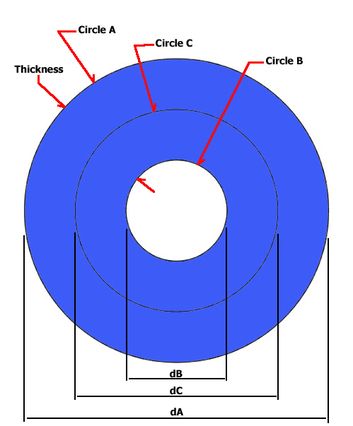
The real secret to making a properly sized paracord bracelet begins with an understanding of three specific circles. In fact, the fabrication of any type of bracelet that embodies some significant thickness, requires an understanding of these three circles and the relationship between them. The thickness parameter can be anything including paracord knots, beads, chain links, twine or rope.
The Secret to Paracord Bracelet Sizing
Circle A is the Outside Circumference of the bracelet.
Circle B is the Inside Circumference of the bracelet, and is equivalent to the desired Wrist Size, for a snug fit. To provide a bracelet that is just a little less snug, this Inside Circumference should be increased by 1/16 to 1/8 inch. Some might even prefer it to be a full 1/4 inch longer, but much more than that, and the bracelet becomes too loose to be comfortable. No one wants a sloppy fitting bracelet.
Circle C is known as the Pitch Circumference, and is an imaginary circle that is exactly half way between the Diameter of Circle A and Circle B.
Thickness of the bracelet is the lineal distance between Circle A and Circle B, also known as the cross-sectional distance. If the bracelet has a fairly constant thickness around the entire circumference, than this lineal distance may be represented by a single measured distance. However, if the bracelet thickness varies significantly, than it is advisable to take several measurements around the circumference of a sample bracelet, and then calculate an average thickness.
As with any circle, each of these circles also has an associated Diameter (d). As may be seen in the drawing above, these Diameters are represented as dA, dB and dC, and would be directly related to their associated Circumference values by the mathematical constant (pi) π (3.14159).
Since Circumference is equal to πd; C = πd , then it follows that d = C/π
The unknown parameter that every bracelet maker MUST be able to calculate is what I call the Flat Layout Dimension. And, the Flat Layout Dimension is the measurement from end to end when the bracelet is laid out flat on your bench or working surface. It turns out this Flat Layout Dimension is exactly equivalent to one of the three Circles I mentioned above. In fact, the Flat Layout Dimension is equal to the Circumference of Circle C. However, as you might recall, Circle C is the imaginary circle that is situated exactly half way between the Diameter of Circle A and Circle B. This is not a problem because as it turns out, we can easily calculate the Circumference of this imaginary circle, in terms of the other circle parameters that we do know.
If we do this one step at a time, you will see how we can arrive at the circumference of the imaginary circle, and thus obtain the appropriate Flat Layout Dimension for any given Wrist Size Measurement.
First, we calculate the diameter d of Circle B. We find the diameter dB = Wrist Size / π
Now that we know the value of dB, we can use that to find the diameter of Circle C.
By examining the drawing above we see that; dC = dB + Thickness
Next, we find Circle A diameter, which is dA = dB + (2 * Thickness) By the way, the reason we want to know the diameter and the circumference of Circle A is because when measuring a completed bracelet, it is much easier to measure the Circle A circumference than it is to measure the circumference of Circle B after the bracelet has been formed into a circle.
Now that we know the diameter of both Circle A and Circle C, it is a simple matter to calculate their respective circumferences.
Circle C Circumference = dC * π
Circle A Circumference = dA * π
Since we said that Circle C Circumference is really equal to our desired Flat Layout Dimension, we now know the secret of how to calculate the correct Flat Layout Dimension so that our bracelet will be made correctly to fit a desired Wrist Size.
Nevertheless, through a little algebraic manipulation, we can simplify the equation we need even more.
By the steps above, we actually found the Flat Layout Dimension was equal to
(Wrist Size / π + Thickness) π
This can be simplified to
Flat Layout Dimension = Wrist Size + (π * Thickness)
Let’s look at an example calculation where we are given a Wrist Size Measurement of 7.0 inches and we find that the average thickness of our knotted bracelet is .320 inches
Then, using the formula above, and substituting the values given;
Flat Layout Dimension = Wrist Size + (π * Thickness)
Flat Layout Dimension = 7.0 + (π * .320)
Flat Layout Dimension = 8.006 inches
And now you know the secret to making a properly sized bracelet no matter what thickness it is and for any given Wrist Size Measurement.
Quelle: https://web.archive.org/web/20140830101905/http://www.tiedinknotz.com/blog/the-secret-to-paracord-bracelet-sizing